posted: Monday, 28 August 2006
Working hard on my latest geometric piece 3.4.2 which I'm loving. With bigger triangles and more space between them than 3.4.1 this is looking quite different. I'm changing colours regularly at set places but am choosing the colours themselves fairly randomly. (fairly randomly doesn't make much sense I know- but I've found I need to regulate how many shiny beads there are without being broken up by some matte, but other than that, the colours used are just whatever I pick up next.)
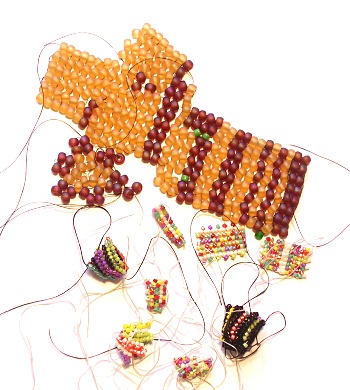
I taught a class on herringbone stitch this weekend. Some of the samples I beaded in the class are in the picture along with some other herringbones samples for a piece I've been working on for around 4 years now! and my experience in that and beading 3.4.2 have confirmed two things that I'll definitely bear in mind when beading other things and hope they'll help you too.
1- Too much shine doesn't look good. There are a few reasons for this- the main one is that when looking at any surface, your eyes search out balance, which means they often look for contrast; if there isn't a contrast they continue searching, don't rest and get tired. This, and the fact they reflect so much light, is why looking at shiny or bright surfaces can often have the effect of hurting your eyes. Adding matte beads gives the required contrast and can make the piece work. Also, shiny beads come forward in a colour scheme, whereas matte beads recede- so if something has lots of shiny beads, they're all fighting for pole position and your attention- you can't relax and look at the whole piece.
Unfortunately, shiny beads are the ones that often first attract us and I have often found when teaching, these are the first beads new beaders buy- and then struggle to use. Shiny beads tire your eyes and add in clear shiny edges, and in my experience, people often find it difficult to even see the hole in the bead; the edges of the beads; or even accurately see how many there are.
All of these make it harder to learn a stitch, as being able to easily pick up beads, or see how they're lying, or how many there are, is essential. Because of this, all my class requirements lists now recommend new beaders begin with matte or less shiny beads – try this for yourself if you're struggling with a stitch or technique and see if it makes a difference.
2- You need to have beads on either side of a colour to see if it works. This is something I always tell people in my classes when they're not sure about a colour. You need to not only try the colour, but bead on further and add beads and colour each side of it to really see if it works. The same often also works in stitches- you need to bead on a few rows before the previous work tightens up and looks as it should. Picture herringbone stitch; the stacks of beads in the last row you added will flare out and not lie next to each other until you bead at least one more row, as each row added has the thread going through previous rows and altering them.
Of course, now I just need to remember these things and not lose heart straight away when something I'm beading doesn't look right!
Some great links with more info on shiny, matte, contrast, and putting colours together:
